

Getting Started with PySpark
Start your free 7-days trial now!
What is PySpark?
PySpark is an API interface that allows you to write Python code to interact with Apache Spark, which is an open source distributed computing framework to handle big data. As the size of data grows year over year, Spark has become a popular framework in the industry to efficiently process large datasets for streaming, data engineering, real-time analytics, exploratory data analysis and machine learning.
Why use PySpark?
The core value proposition behind PySpark is that:
Spark partitions the dataset into smaller chunks and stores them in multiple machines. By doing so, Spark can efficiently process massive volumes of data in parallel. This is extremely useful when you are dealing with large datasets that cannot fit into the memory of a single machine.
PySpark can handle a wide array of data formats including Hadoop Distributed File System (HDFS), Cassandra and Amazon S3.
Anatomy of Spark
The following diagram shows the main components of a Spark application:
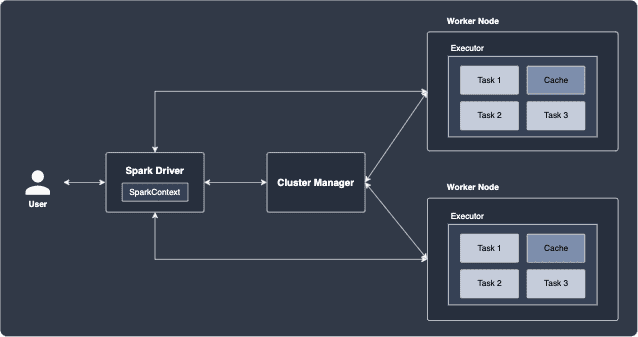
Briefly, the roles of each component are as follows:
Executors
Executors are threads or processes in the worker nodes that perform individual tasks. You can think of nodes as another word for machines. In the above diagram, there are 3 tasks (to be defined later) assigned to each executor, and the worker node spawns a single executor that handles these tasks one after another. As we shall see later, a single executor can be allocated with multiple CPUs, which allows the executor to handle tasks in parallel.
Worker nodes
Worker nodes are machines that host the executors. A worker node can host multiple executors if CPU and memory are available.
Spark Driver
Spark Driver is the entry point of the Spark application that receives the user's Spark program, and is responsible for the following:
creating the SparkContext, which provides the connection to the cluster manager. SparkContext holds configuration parameters such as the application name, number of CPU cores, memory size of executors running on worker nodes.
submitting jobs and converting them into tasks. These tasks are then to be handled by executors.
coordinates the execution of worker nodes and aggregates data from the worker nodes.
Cluster manager
The cluster manager processes that monitor worker nodes and reserve cluster sources for the Driver to coordinate. There are many cluster managers to choose from such as YARN, Kubernetes, Mesos and Spark Standalone. There are of course differences in how resources are allocated for each of these managers, but they all come with a clean visual web dashboard for live monitoring of your cluster. Note that the cluster manager does not manage the worker nodes directly (this is the job of the Driver). Instead, the cluster manager simply requests for resources for the Driver to use.
All these components are written in a programming language called Scala, but they are compiled into Java byte-code so that they run in a Java Virtual Machines (JVM), which is a cross-platform runtime engine.
RDD (Resilient Distributed Dataset)
The basic building block of Spark is the Resilient Distributed Dataset (RDD), which is an immutable data structure that is logically partitioned across multiple nodes in the cluster for parallel computing. The following diagram illustrates an example of a RDD:
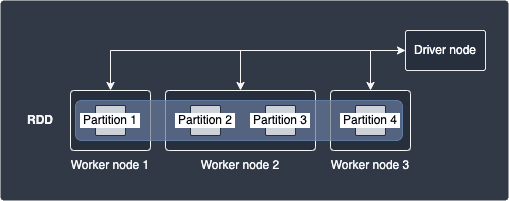
Here, our dataset is represented by a single RDD that consists of 4 partitions that is hosted by 3 separate worker nodes. Note that worker nodes may hold different number of partitions - for instance, worker node 2 holds partitions 2 and 3 in this case.
For our comprehensive guide on RDDs, click here.
Transformations and Actions
There are two types of operations we can perform on RDDs:
Transformations
Actions
Transformations
A transformation takes in as input one or more RDDs, and returns a new RDD by applying some function to the data. Examples include map(~), filter(~), sortByKey(~). Transformations can be applied one after another as shown below:
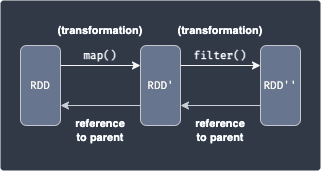
Here, we are applying the map(~) transformation which applies a function over each data to yield a new RDD, and then we perform the filter(~) transformation to obtain a subset of the data. RDDs are immutable, meaning RDD cannot be modified once created. When you perform a transformation on a RDD, a new RDD is returned while the original is kept intact.
Each newly created RDD holds a reference to the original RDD prior to the transformation. This allows Spark to keep track of the sequence of transformations, which is referred to as RDD lineage.
Actions
An action triggers a computation, and returns a value back to the Driver program, or writes to a stable external storage system:
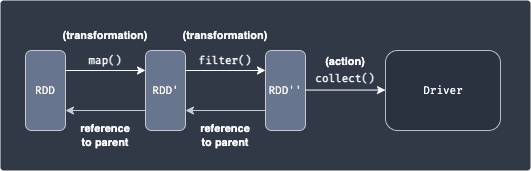
This should make sense because the data held by the RDD even after applying some transformation is still partitioned into multiple nodes, and so we would need to aggregate the outputs into a single place - the driver node in this case.
Examples of actions include show(), reduce() and collect().
Since all the data from each node is sent over to the driver with an action, make sure that the driver node has enough RAM to hold all the incoming data - otherwise, an out-of-memory error will occur.
Lazy transformations
When you execute the transformation, Spark will not immediately perform the transformation. Instead, RDD will wait until an actionlink is required, and only then will the transformation fire. We call this behaviour lazy-execution, and this has the following benefits:
Scheduling - better usage of cluster usage
Some transformations can grouped together to avoid network traffic
Spark jobs, stages and tasks
When you invoke an action (e.g. count(), take(), collect()) on an RDD, a job is created. Spark will then internally decompose a job into a single or multiple stages. Next, Spark splits each stage into tasks, which are units of work that the Spark driver’s scheduler ships to executors on the worker nodes to handle. Each task processes one unit of partitioned dataset in its memory.
Executors with one core
As an example, consider the following setup:
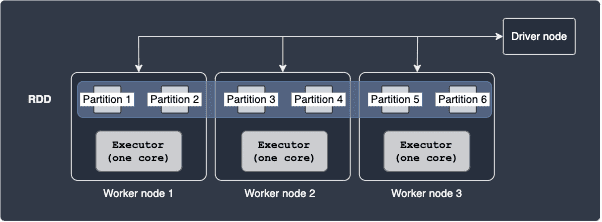
Here, our RDD is composed of 6 partitions, with 2 partitions on each worker node. The executor threads are equipped with one CPU core, which means that only one task can be performed by each executor at any given time. The total number of tasks is equal to the number of partitions, which means that there are 6 tasks.
Executors with multiple cores
Multiple tasks can run in parallel on the same executor if you allocate more than one core to each executor. Consider the following case:
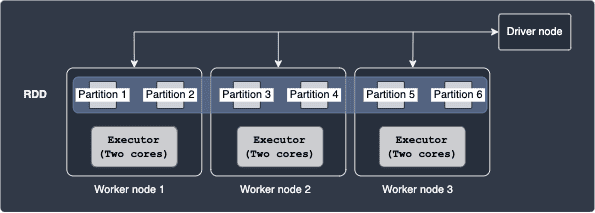
Here, each executor is equipped with 2 cores. The total number of tasks here is 6, which is the same as the previous case since there are still 6 partitions. With 2 cores, each executor can handle 2 tasks in parallel. As you can tell from this example, the more number of cores you allocate to each executor, the more tasks you can perform in parallel.
Number of partitions
In Spark, we can choose the number of partitions by which to divide our dataset. For instance, should we divide up our data into just a few partitions, or into hundreds of partitions? We should choose carefully because the number of partitions has an immense impact on the cluster's performance. As examples, let's explore the case of over-partitioning and under-partitioning.
Under-partitioning
Consider the following case:
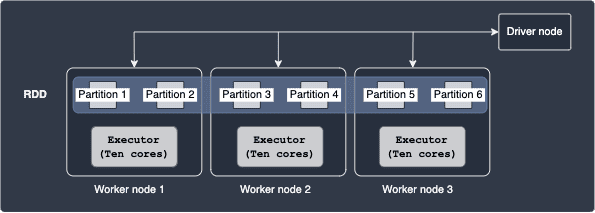
Here, each of our executors is equipped with 10 cores, but only 2 partitions reside at each node. This means that each executor can tackle the two tasks assigned to it in parallel using just 2 cores - the other 8 cores remain unused here. In other words, we are not making use of the available cores here since the number of partitions is too small, that is, we are underutilising our resources. A better configuration would be to have 10 partitions on each worker node so that each executor can parse all 10 partitions on their node in parallel.
Excess partitioning
Consider the following case:
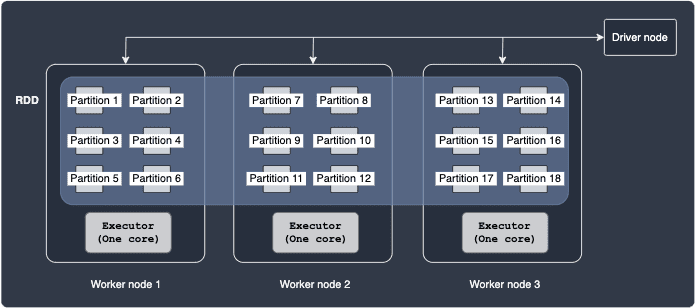
Here, we have 6 partitions residing in each worker node, which is equipped with only one CPU core. The driver would need to create and schedule the same number of tasks as there are partitions (18 in this case). There is considerable overhead in having to manage and coordinate many small tasks. Therefore, having a large number of partitions is also not desirable.
Recommended number of partitions
The official PySpark documentationopen_in_new recommends that there should be 2 to 4 partitions for each core in the executor. An example of this is as follows:
Here, we have 2 partitions per worker node, which holds an executor with one CPU core. Note that the recommended offered by the official documentation is only a rule of thumb - you might want to experiment with different number of partitions. For instance, you might find that assigning two cores for each executor here would boost performance since the 2 partitions can be handled in parallel by the executors.
Next steps
This introductory guide only covered the basics of PySpark. For your next step, we recommend that you follow our Getting Started with PySpark on Databricks guide to get some hands-on experience with PySpark programming on Databricks for free. After that, you can read our Comprehensive guide to RDDs to learn much more about RDDs!